How to Post Custom Via Status on Facebook
Steps to Post Custom Via Status on Facebook
Step 1:
First of all In order to Post Custom Via Status on Facebook, you will
need to Create an app on Facebook, Nope thats not hard at all, you dont
need to do any Coding, Follow me while i show you how to do it.
Step 2:
Click here to goto Facebook Developer page, there if you are asked to register as developer,read this step and if you are not asked and you are already registered then skip to Step 3.
Click on Register as developer and Check the box ” I accept the Facebook Platform Policy and the Facebook Privacy Policy” and Click on Continue > Continue > Done.
Step 3:
Now you are Registered as Developer, Now click on Create new app, Next
Step is to name your App so Name it any thing that you want to show as
“updated via xyz” . Here in my case it will show ” updated via Get it
Free ” as i have named it Get it Free as you can see in the below
Picture. Now click on Continue, Leave everything else as it is.

Step 4:
On the next page you will be filling some more details like App domain
and Site url, As you can see i have entered my site url in both the
Cases. Everything is done now Click on Save Changes. Note the APP ID we
will need it in Next Step

Step 5:
You app is Ready, Now its time to use it. Simply Copy the Below URL,
Open new tab in your Browser, Paste it in address bar, You will have to
Replace my APP ID with yours in following URL which is Highlighted in
Green Color,
https://www.facebook.com/dialog/feed?app_id=%20808886805790457&redirect_uri=http://sharoonqadeer.blogspot.com
Also Understand that if you want to Redirect your Friends to your own
blog when they try and click on your Custom Via Status, then Replace
sharoonqadeer.blogspot.com with yours in the above URL.
Step 6 :
Once you have Replaced the app id and Pasted the URL in your address
bar, hit enter and boom, you will see something like below Pic,obviously
with your app name.

Step 7:
Now its time to let your Friends know about this, Write your status and
click on Share. You will Be redirected to
http://sharoonqadeer.blogspot.com but its time to check your timeline to
see your Custom via Facebook Status.
Conclusion :
So Now in this Article you learned how to Create your own App and how to
Post Custom Via Status on Facebook. If In Case you find it Tedious,
then i will share one more method, you simply go Here and Click on any name you want as updated via of your choice and you will be taken to the status update page directly.
You might be thinking why so long process when you can do it with this
site way to easy? Well, My main aim was to explain the whole process of
how it works. and on the above mentioned site, you are limitation to
choose the name from the option provided. its always better to make your
own choice of custom name .
How to delete a protected EFI disk partition with Windows 7 or 8
As
you probably know, in order to be able to store files on a hard drive,
it needs to be prepared just right: it needs to be initialized,
partitioned, and formatted just the right way. If you've bought an
external drive in a store, the preparation has probably been already
done by the drive manufacturer. However, what if you want the drive to
be prepared differently? For example, you may want to re-format the
drive, or change the partitions that it has. The way to do such tasks in
Windows is to use the Disk Management tool that comes preinstalled with
Windows.
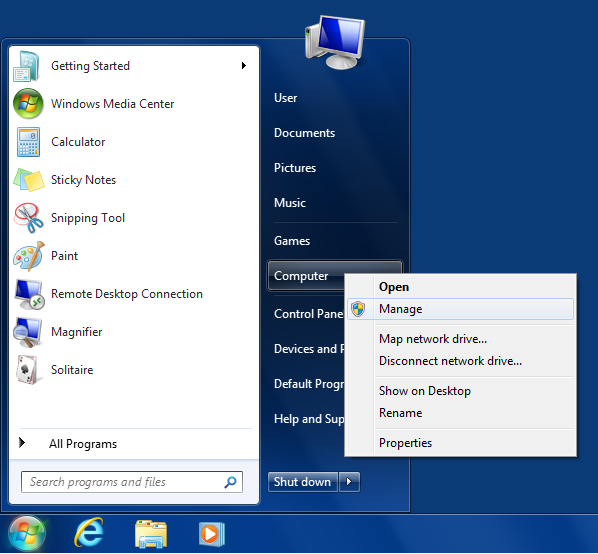
To get to the Disk Management tool, click on the Start button, right-click on Computer, and choose Manage from the menu:
Wait, I have a Windows 8 computer that does not have the Start menu, what should I do, you might ask? It's an easy problem to solve: just install our tool StartFinity and you will get a full-featured Start Menu for your Windows 8 or 8.1 computer in no time at all.
Before you click on Manage, first things first: Disk Management is a very powerful tool, and with great power comes great responsibility!
If you are not very experienced with computers, you can look, but
better not touch and let someone more knowledgeable to do the job.
Because with Disk Management it's very easy to destroy your partitions
and lose your files, if you don't know what you are doing.
After you've clicked on Manage, wait a few seconds for the Computer
Management console to open. Select Disk Management in its navigation
page and wait a few more seconds. Finally, the list of the disks that
are attached to your computer will be displayed in its main window pane:
In our case, the
60 GB disk (shown as 55.89 GB disk in the list) is Disk 4 (let's
remember this number, we will need it a bit later.) It has two
partitions, one is a 200MB EFI partition that has no drive letter
assigned, and another NTFS partition of the size 55.69 GB, that has the
label test and
the drive letter F:. Although these two partitions looks similar, they
are treated very differently by Windows. If you right-click on the
normal NTFS partition, you should see the normal menu that lets you
perform various tasks on that partition, including the Delete Volume
command:The
most important thing when using the Disk Management tool is to make
sure you can identify the disk you want to manage in the list. Usually
you can do it by the total size of the disk displayed, although it may
be confusing. For example, in this example, a hard drive that's marked
as 60 GB drive by the manufacturer, is shown to have only 55.89 GB
by Windows. (Apparently, the disk manufacturers and Windows have a
different understanding of what a "gigabyte" is.) Also, if you have
several disks of the same size attached, it may get even more confusing.
If in doubt, better unplug all external drives except for the one you
actually want to work with, to make sure you are not accidentally
erasing data on a wrong disk!

However, if we right-click on the first EFI partition, the menu we get is completely disabled:

As you can see, the partition is protected in such a way that even the
powerful Disk Management tool cannot do anything to it. Note that it's
not because the partition is EFI, it's because the tool that created
that partition had marked it in a way that prohibits other tools to
tamper with it. (That's usually the case for the system hard disks
formatted on the Mac computers.) However, what if we want to delete such
a partition and re-initialize the disk from scratch?
While the Disk Management tool is helpless in this situation,
fortunately Windows offers yet another tool, DISKPART, that can do
things to the disks that Disk Management can't. The tricky part is, that
DISKPART is a command-line tool, that requires us to type commands into
its command prompt to make it do what we want.
To get access to the DISKPART tool, first let's open the Windows command
prompt in the "administrator" mode. We can do that by clicking the
Start button and entering cmd in the search box:

Make sure that cmd is highlighted on the menu above, but do not
press the Enter key yet! Instead, press the Ctrl and Shift keys
together, and while keeping them depressed, press Enter. The Ctrl+Shift
combination makes the command prompt to open in the "administrator"
mode. To start the DISKPART tool, enter the diskpart command into the command prompt window:

This should display the DISKPART command prompt. The first command we should use is list disk that should display the list of the disks currently connected to the computer:

 Again,
it's very important to properly identify the disk we want to work with
in the list. Our 60 GB disk is still listed as Disk 4 with the capacity
55 GB. Once we are sure that this is the disk we want to re-initialize,
we need to select it, by entering the command select disk 4 (yes, that's how selection is usually done when using the command line tools!). Then, let's use the list disk command again, to confirm that the disk in question is indeed now selected:
Again,
it's very important to properly identify the disk we want to work with
in the list. Our 60 GB disk is still listed as Disk 4 with the capacity
55 GB. Once we are sure that this is the disk we want to re-initialize,
we need to select it, by entering the command select disk 4 (yes, that's how selection is usually done when using the command line tools!). Then, let's use the list disk command again, to confirm that the disk in question is indeed now selected:
After double-checking that Disk 4 is now selected (it should have the star character * in
front of its label), it's time to finally issue the command that will
erase everything on the disk 4, including the protected partition. The
command that does that is clean. Note that this command erases everythingon
the selected disk, all partitions, protected or not. If you still have
files on other partitions of disk 4 that you want to keep, you should
exit now and backup those files, because after using the cleancommand all such files will be erased without a trace!

After the clean command is done (it should take no more than a
few seconds), we get a fresh disk with all partitions erased. We can
exit the DISKPART command prompt (by typing exit into its command
line), and go back to the Disk Management tool (see above how to open
it.) When it starts, it automatically detects the presence of the clean
disk and prompts us to initialize it:

Press OK and the newly cleaned disk will appear in the list. The
difference is, the protected EFI partition is gone! (The normal NTFS
partition that used to be on the disk 4, is gone, too.) The disk is now
ready for you to start creating partitions, formatting them, and do
other things as needed:

Note that if you are trying to erase the system disk that hosts the C:
drive where Windows itself is installed and running, then even the
powerful DISKPART command can't work: Windows simply refuses to erase
the drive from which it is running. To erase such a disk, you need to
physically remove it from the computer, attach it to another computer as
an external drive, and then use DISKPART on that computer to erase the
disk.
Happy disk managing!
Wednesday, 9 July 2014
UNetbootin Direct Download Link for Free
Introduction
UNetbootin allows you to create bootable Live USB drives for Ubuntu,
Fedora, and other Linux distributions without burning a CD. It runs on
Windows, Linux, and Mac OS X. You can either let UNetbootin download one
of the many distributions supported out-of-the-box for you, or supply
your own Linux .iso file if you've already downloaded one or your
preferred distribution isn't on the list.
Requirements
- Microsoft Windows 2000/XP/Vista/7, or Linux, or Mac OS X 10.5+. Note that resulting USB drives are bootable only on PCs (not on Macs).
- Internet access for downloading a distro to install, or a pre-downloaded ISO file
Features
UNetbootin can create a bootable Live USB drive, or it can make a
"frugal install" on your local hard disk if you don't have a USB drive.
It loads distributions either by downloading a ISO (CD image) files for
you, or by using an ISO file you've already downloaded.

Download For Windows
Tuesday, 8 July 2014
Free Mp4 Video Converter registered No Serial Key needed Full Version Download for Free
File Type: RAR
Size: 31.1 MB
Input file formats: *.avi; *.ivf; *.div; *.divx; *.mpg; *.mpeg; *.mpe; *.mp4; *.m4v; *.webm; *.wmv; *.asf; *.mov; *.qt; *.mts; *.m2t; *.m2ts; *.mod; *.tod; *.vro; *.dat; *.3gp2; *.3gpp; *.3gp; *.3g2; *.dvr-ms; *.flv; *.f4v; *.amv; *.rm; *.rmm; *.rv; *.rmvb; *.ogv; *.mkv; *.ts.
Free MP4 Video Converter contains no spyware or adware. It's clearly free and absolutely safe to install and run.
DVDVideoSoft's products are freeware. In order to maintain product development and provide you with high-quality software, DVDVideoSoft may bundle links to other websites and third-party apps installations including toolbars in its products. Every time DVDVideoSoft products are installed, you have an obvious option to accept or opt-out of such installations.
Windows 8, 7, Vista, XP SP3

Download
Password For RAR Archive:
sharoonqadeer.blogspot.com

Monday, 7 July 2014
How to Get Admin Password in Windows 7

Disclaimer: This is for use on a PC that you own. Breaking into someone else's PC is considered a serious crime in most places. If you make a mistake or change something else, your Windows 7 may become a non-boot. If so, just undo whatever you changed outside of the hack shown here, and it will be fine.
Difficulty Level: 2/10
Prerequisites:
- Any Linux Live CD/DVD (ex. Ubuntu Live, Linux Live, Kali, etc.).
- Ability to use said Linux CD/DVD.
- Basic understanding of Windows file structure. i.e. can navigate.
- The desire to modify user account(s) on said Windows box.
- Physical access to said Windows box.
- Ability to use command line and basic understanding of net user commands.
Things to Note:
- If you are trying to hack a spouse's account, you are screwed cause they wont be able to use the old password anymore—try explaining that.
- This hack works on Windows 7, 8, Server 2008, and basically any that have ease of access. Servers require "net user Administrator blabla /domain".
- This will destroy all data encrypted with EFS on the account if it's enabled (you have to enable it first).
- If you do not undo the hack after you change the password, you will get the magnifier every time you use cmd or nothing at all.
- If you modify or delete any other files in Sys32, your next boot up is doomed (maybe).
- Scared? You should be. Now let's go.
Step 1: Boot Some Flavor of Linux Live CD
Insert CD/DVD into drive and reboot the machine. Start your Live DVD. You may need to go into the BIOS screen and change the boot-up order to CD/DVD drive first, HDD second.Step 2: Navigate to Sys32
Use the file browser in your Linux environment, navigate to%windir%/system32/. You may have to right-click and mount the Windows partition/drive first or use the NTFS-3G command.Step 3: Rename Magnify.exe
Find and rename magnify.exe (Magnifier file) to magnify.old.Step 4: Rename cmd.exe
Find and rename cmd.exe to magnify.exe.Step 5: Shut Down Linux & Reboot Windows
Logout, remove DVD, and reboot into Windows.Step 6: Get CMD Prompt Modify Accounts
When Windows reboots, click on the ease of access button in the bottom left corner. Click magnify and hit apply. Ta da. You have a system level command prompt.Tip: You can right-click on cmd.exe and click run as administrator inside of Windows for escalated privileges. To edit files, it would never be allowed at basic admin level (caution).

As the photo above shows, type net user to get a list of accounts.
Your Options (Choose One That Applies):
Change Password:
net user username new_passwordWhen you do so, the password changes without prompting you again.
Add an account:
net user username password /addTip: If your username has a space, like John Doe, use quotes like "John Doe".
Admin that:
net localgroup administrators username /addDelete that:
net user username /deleteRemote Desktop Users Group: (just in case)
net localgroup Remote Desktop Users UserLoginName /addDomain i.e. Servers:
net user for domainNet User Syntax:
net user commands ReferenceStep 7: Reboot Linux & Fix magnfiy.exe
Now you should insert your Linux Live CD/DVD and rename the files back to original names or you will have issues later.- Repeat Step 1
- Repeat Step 2
- Rename magnify.exe back to cmd.exe
- Rename magnify.old back to magnify.exe
- Log out, take out CD/DVD, reboot into Windows
Well, that was how you hack a Windows 7 admin account password with Windows Magnifier. Hope it helps you in some way. CHH :-)
Caricature Software Photo to Cartoon 7.0.5281.36901 Download with Free Keygen

Setup + Keygen
Type : 7z Archive
Size : 7.54 MB
Download Page
Keygen v7.x
Type : 7z Archive
Size : 0.05 MB
Download Page
Free License Keys:
- 9109-5982-6987
- 5167-9582-1905
- 1152-1707-0904
- 3561-6507-4523
- 7211-3807-3907
- 3853-1107-5216
- 0276-2082-2290
- 7649-1482-0288
- 3780-7632-9374
- 1225-6282-8758
Facebook Popup Box Coding for Website or Blog

You have to do these steps to install it on your Blogger Blog
- Go to blogger dashboard > Template
- Now click on > Edit HTML
- Press Ctrl+F and search for </body>.
- Now paste this code just above the </body> and click on Save Template
#getitfreeFBpop {
position:fixed !important;
position:absolute;
top:-1000px;
left:50%;
margin:0px 0px 0px -182px;
width:300px;
height:auto;
padding:16px;
background:#FEFEFE;font:normal Dosis, Georgia, Serif;
color:#111;
border:2px solid #333;
-webkit-box-shadow:0px 1px 2px rgba(0,0,0,0.4);
-moz-box-shadow:0px 1px 2px rgba(0,0,0,0.4);
box-shadow:0px 1px 2px rgba(0,0,0,0.4);
-webkit-border-radius:10px;
-moz-border-radius:10px;
border-radius:10px;
}
#getitfreeFBpop a.getitmuftclose {
position:absolute;
top:-10px;
right:-10px;
background:#fff;
font:bold 16px Arial, Sans-Serif;
text-decoration:none;
line-height:22px;
width:22px;
text-align:center;
color:#000000;
border:2px solid #333;
-webkit-box-shadow:0px 1px 2px rgba(0,0,0,0.4);
-moz-box-shadow:0px 1px 2px rgba(0,0,0,0.4);
box-shadow:0px 1px 2px rgba(0,0,0,0.4);
-webkit-border-radius:22px;
-moz-border-radius:22px;
border-radius:25px;
cursor:pointer;
}
</style>
<script src='http://ajax.googleapis.com/ajax/libs/jquery/1.4.1/jquery.min.js' type='text/javascript'/>
<script type='text/javascript'>
$(window).bind("load", function() {
// Animate Top
$('#getitfreeFBpop').animate({top:"150px"}, 1000);
// Widget by sharoonqadeer.blogspot.com
$('a.getitfreeclose').click(function() {
$(this).parent().fadeOut();
return false;
});
});
</script>
<div id='getitfreeFBpop'>
<!-- Widget by sharoonqadeer.blogspot.com Start -->
<center>
<b>Get Notifications of Our New Posts on Facebook</b></center>
<center>
<iframe allowtransparency='true' frameborder='0' scrolling='no' src='//www.facebook.com/plugins/likebox.php?href=https%3A%2F%2Fwww.facebook.com%2Fgetitfreee&width=300&height=258&show_faces=true&colorscheme=light&stream=false&show_border=false&header=false&appId=196282097100252' style='border:none; overflow:hidden; width:300px; height:258px;'/>
</center>
<!-- Widget by sharoonqadeer.blogspot.com End -->
<a class='getitfreeclose' href='#'>×</a>
<center style='float:right; margin-right:10px;'>
<span style='font-size:xx-small; color:#000; text-decoration:none;'/></center>
</div>
, then replace getitfreee with your page url.
How to Download APK Files Directly from Play Store to Your PC
- Search the app on PlayStore.
- Open the details of app.
- Now just change play.google in address bar with apk-dl.
- Your Browser will say that the Security Certificate is Invalid, because it provides the Security Certificate of Play Store. You must click on Proceed Anyway or Add Exception in Firefox.

- Your app will start downloading.
No comments:
Post a Comment